First off – this is what we in the Lazy Daze community call an “Andy Baird Pantry”. Praise and kudos go to Andy Baird for building one in his Lazy Daze motorhome ‘Gertie’, then doing another in his current ‘Skylark’. He wrote it up completely with great info and pictures, and drew up design plans that make it very easy to follow and duplicate. (Also, there is a LOT of other great info on his “Eureka!” website.)

The ‘before’ picture. This space is calling out for a floor to ceiling pantry closet.
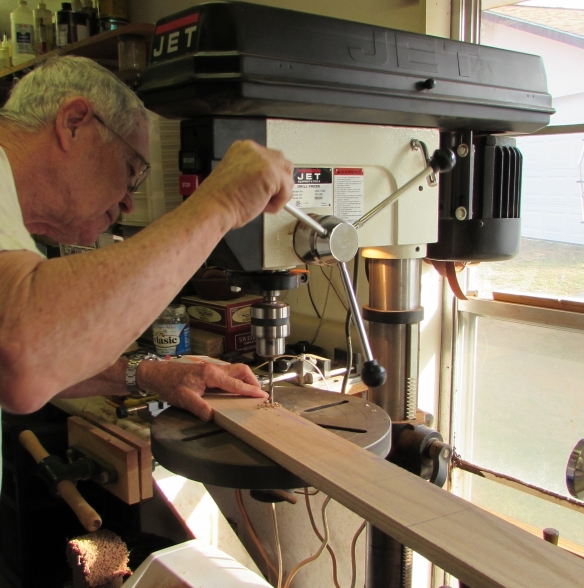
Anyway, I’d always wanted an Andy Baird pantry. Both on my prior rig, which was the same floorplan as Gertie, and my new RV, which is the same plan as Skylark. While parked at my folks place (with the awesome wood shop) I asked my dad if I would be able to build one. Turns out I never would have been able to do it myself, but together we did get it done. We studied Andy’s plans and one day headed in to Home Depot and Lowe’s in Marble Falls to get the supplies. Dad thought we would need three pieces of oak 8-foot 1×4 boards to make the two 6′ tall sides, plus top/bottom/center pieces and the moveable shelves. Instead of using the full 1″ thick shelf pieces he would run them through a saw and make 2 shelf pieces out of each shelf board. I wasn’t sure they would look good or work well being sawed in half and 3/8″ thick. However, I was wrong. After running through the sander they looked perfectly fine. And oak is very strong, even at half thickness.
The other big piece was the door, which was to be an 18″x72″ piece of 3/8″ oak veneer plywood. Turns out that piece is hard to find. Home Depot and Lowe’s had 1/2″ oak veneer plywood, or 3/8″ of poplar or other lesser woods. We figured we would have to find it at a specialty wood shop in south Austin, although I couldn’t find any online. But, at one point we were driving through Burnet, passing by a cabinet maker he knew who was retiring and closing down his business. We popped in and he had a piece that I could buy back at the shop at his house. Score! We felt really lucky that dad noticed the guy cleaning out his building as we passed by and that he had the piece available. We were able to get the other parts: hinges, L-brackets, magnetic catches, pull handles, etc. at Home Depot and at a True Value hardware store.
First thing to do was to make holes in the sides. I didn’t really think I needed holes spaced an inch or two the whole way down. We did holes at 4″ intervals, then the next day I asked to add a couple of spots with 2″ intervals. That should allow enough flexibility for shelf placement. Having a wood shop with a drill press is handy!
Preparing the sides

Sides with holes, and the 3 top/bottom/center pieces with 8 more shelves. (Before adding the additional holes.)
The cabinet was built at neighbor Don’s “Garage Majal”. My dad and his buds Alan and Don love working on whatever project anyone comes up with.

Building the cabinet with Alan

Adding the door hinges with Don
Once the cabinet was built I got busy sanding and staining. My dad had a power sander, so that made short work of prepping the pantry. I already had some stain that was a close match to my rig’s interior from making the solar monitor mounting plate. It really worked well on the red oak. After sanding I let it dry then sanded it with steel wool. Then applied a lacquer finish, and went over it with steel wool again.

Sanding and staining
Andy wrote about stain-able oak veneer iron-on edging for the edge of the door. The side of plywood is not pretty. I picked up some “Band-It” at Lowe’s and it took the stain really well. It ironed on well, too. It’s wider than the 3/8″ plywood, so we trimmed the excess with a box cutter knife.

Staining the iron-on trim
Then, we got the door put back on and attached it to the wall with the L-brackets. We really wanted to attach to something besides just the wood paneling on the back of the shower wall. There aren’t vertical studs in the wall there, but we did find a couple of horizontal pieces with the stud finder, so screwed into those.
Here it is, finished and mounted. I was even able to find the decorative medallion handle piece that Andy used. I really liked the idea of having a pull knob that doesn’t stick out.

New Pantry
And, we were able to keep the accordian door that lives on the side there. Andy had removed his to move the pantry further back, as he didn’t use that door much. I use that door A LOT, probably a few times a week. I didn’t want to lose it to gain the pantry. I want it all, of course!
The little hook and eye piece was the hardest to find. Generally those type pieces found at hardware stores are crude, barn door type fixtures. Finally, I found this little guy below, at Home Depot in Austin.

View of side of door showing iron-on trim and door hardware
The door is held closed with the 3 magnetic catches. The hook/hasp is extra security when traveling.

Interior View
One problem we had was the spot was right in front of the duplex outlet for the back of the coach. We had to cut out a hole in the back for the outlet, then cut a hole in the side so I can run a cord through the side. I have a power strip plugged in there now, so I can just plug into that as needed. One major item we did differently than Andy’s plans was to put a backing board (1/4″ thick) on the pantry. It made it easier to get the thing square, and didn’t add much weight-wise. But, then we had to deal with the plug. Easy fix, though

Cutouts for electrical outlet
All loaded up:

Pantry in use
I found a package of 10 hangers at the dollar store one day. These are good heavy wire. I cut the tops off with snips, then bent for shelf guards, like Andy shows on his site.

Making wire shelf guards
I’ve only added 2 so far. I bungled up those shelves making the holes with my Dremel tool. I packed my good Dewalt cordless drill this trip, so will get that out one of these days and make proper holes in the other shelves for the wire hanger guards to sit in. Surprisingly the stuff doesn’t move around much in travel. I have not opened the pantry and had anything fall out yet. Yet. So, I really should get the rest of the wire guards up. 🙂
Altogether, the materials cost $182. Plus, the invaluable time and efforts of my dad (and Don and Alan). I think it’s a great addition to my home!
 My Lazy Daze friend Kathy was here today getting work done, too. Last night we had dinner in Old Town with Lisa, another Ladeze attendee.
 We will be in Albuquerque through the Balloon Fiesta (Oct 4th-12th). I have been organizing the Lazy Daze group at the Fiesta, so we will get there early and stay to the end. Hope to get some blogging done between now and the end of the month. I have lots of pictures to sort through from Santa Fe and Ladeze. More later….